


An Overview of Class 11 Biology Parts Of The Compound Microscope Experiment
Introduction
The first compound microscope was invented by Z. Janssen. Since Janssen was a teenager, his father Hans supported him in both his writing and the creation of the first microscope. They found a compound microscope with two lenses, one lens placed close to the object and the other serving as the eyepiece. Through a compound microscope, people can view the samples or specimens with high magnification. This experiment deals with different parts of the compound microscope(mechanical parts and optical parts).
Table of Contents
Aim
Apparatus required
Theory
Procedure
Observations
Result
Precautions
Lab Manual Questions
Viva Questions
Practical Based Questions
Conclusion
FAQs
Aim
To study parts of a compound microscope
Apparatus Required
A compound microscope
Silk cloth
Lens cleaning fluid
Lens cleaning paper
Notebook
Theory
What is a Compound Microscope?
An instrument called a compound microscope has a combination of lenses that are used to view enlarged images of tiny objects that are placed on a glass slide. A combination of lenses can produce accurate and enlarged images of tiny particles or things. Compared to other low-power microscopes, a compound microscope has the ability to attain higher magnification levels.
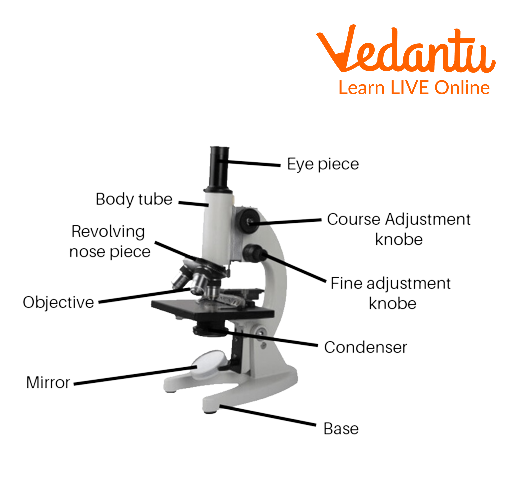
Parts of Compound Microscope
Parts of a Compound Microscope
The several parts of a compound microscope are classified into two major categories,
Mechanical Parts
Optical Parts
A. Mechanical Parts
A base: It is the foot of the microscope that bears all of the weight of the microscope.
Pillar: It supports the stage of the microscope by resting on the base.
Arm: It is a curved structure. The entire microscope can be handled using this arm.
Stage: The stage is the flat plate that is attached to the lower part of the arm. The specimen is set up on the stage for observation and examination. There is a hole in the middle of the stage through which light can enter.
Inclination joint: It is a joint where the arm is attached to the pillar of the compound microscope. This joint can be used to tilt the microscope.
Clips: Two clips are connected to the upper portion of the stage. With the help of these clips, the slide can be kept in place.
Diaphragm: The diaphragm is fixed in place below the stage. It regulates and modifies the amount of light that enters the microscope.
Nose Piece: The bottom end of the body tube is joined to the revolving, circular nose piece. The nose piece has three holes wherein the objective lenses are inserted.
Body tube: It is a hollow and tubular structure, and is part of the arm's top portion on the microscope. It is possible to control the body tube with the help of adjustment knobs.
Fine adjustment knob: It is a smaller knob used to focus an object precisely and sharply.
Coarse Adjustment knob: It is a large knob used to adjust the body tube to precisely focus on the specimen.
B. Optical Part
Eyepiece lens: It is also known as ocular. It is mounted at the top of the body tube. There are several markings, such as 5X, 10X, 15X, etc., on the eyepiece's rim. These show the magnification strength. With the help of this eyepiece, the object's magnified image can be observed.
Mirror: The mirror is located above the base. It is used to reflect light into the microscope. On one side is a regular mirror, and on the other is a concave mirror.
Objective lenses: There are two objective lenses attached to the rotating nosepiece at the base of the body tube. These three lenses are, the oil immersion objective lens – 100X, high power objective lens – 45X, and low power objective lens – 10X.
Working of a Compound Microscope
A compound microscope uses a combination of lenses to improve the magnification and resolving power while observing the specimen.
The specimen or object to be examined is mounted on a transparent glass slide and positioned on the specimen stage between the condenser and objective lenses.
A beam of visible light from the base is focused on the specimen by a condenser lens.
The specimen's light is captured by the objective lens, which magnifies it inside the body tube to create the primary image. This image is once more magnified by the ocular lens or eyepiece.
In order to line the higher magnification objective (often 45X) with the lighted portion of the slide is used. The compound microscope's nosepiece must be turned after low-power focusing.
Sometimes it is necessary to use a very high magnification (e.g. for observing bacterial cells). In this case, an oil immersion objective lens (typically 100X) is used.
Procedure
Look through the eyepiece and adjust the mirror so that enough light can enter the microscope.
The slides, stage, mirror, and lenses all need to be dust-free and clean.
The centre of the stage should have a slide.
To ensure that the slide cannot move, firmly fasten clips to both of its edges.
The low power objective is aligned with the focal point that has been placed on the slide by adjusting the nose piece.
You can move the coarse adjustment knob upwards or lower until the slide is clearly in focus.
To get a clean and sharp image of the object in focus, move the fine adjustment knob upwards or downwards.
Under a low power objective, all of the object's fine details can be seen. Students can sketch the diagram of whatever they observe.
The high power objective is now aligned with the object by turning the nosepiece. To obtain a clear and accurate image of the object, the fine adjustment knob can be set as required.
The features of the object can be seen at high magnification.
Draw all the necessary diagrams of your observations.
When the object is being studied with high power, the coarse adjustment knob shouldn't be used since it could break the slide.
Observations
The microscope has a sturdy base foot, and its vertical arm and inclination joint are linked together. For more easy use, the arm can be tilted at various angles.
The microscope's stage is square, rectangular, or spherical, and the arm is fixed. A tiny hole in the middle of the stage is circular.
Two clips or other mechanical devices are supplied on the stage for fixing and retaining the slide securely in place.
Below the condenser is a fitting mirror that may be adjusted. It has plano-concave surfaces to concentrate the rays of light.
A moveable tubular body tube serves as the microscope's body.
The tube has an eye or ocular.
A particular component of magnification that can be adjusted for lower or higher
magnifying power, such as 5X, 10X, or 15X.
Additionally, eyepieces with pointers are also available.
A pair of objective lenses (10X, 40X, or 45X) are mounted at the bottom end of the nosepiece.
A third objective lens (100X) known as an oil immersion lens may also be present in some microscopes.
With the use of the coarse adjustment knob and the fine adjustment knob, the tube containing the eye and objective lenses can be raised or lowered to sharply focus the object.
The coarse adjustment is used to examine the object at lesser magnification first, and the rotating nosepiece with the fixed objective lenses is used to view it at higher magnification.
Only the fine adjustment knob is used for fine focus setting while viewing at higher magnification.
Result
All the parts of the compound microscope were observed and studied.
Precautions
Handle the microscope with both hands.
Before using, the objective lenses and eyepiece should be cleaned with a silk cloth and cleaning solution.
When using the microscope, it should not be tilted.
When examining an object, start with a low power objective and work your way up to high power.
After all observations have been made, the lower power must remain in place.
It is important to focus carefully so that the objective lens never comes in contact with the stage or the slide.
When using the high power objective, you should only use the fine adjustment knob.
Before observing a specimen in a microscope make sure that the well-mount preparations are covered with a cover slip.
Use the concave portion of the mirror in low light.
Without oil, oil immersion lenses should never be used.
Lab Manual Questions
1. What is the magnification achieved when a 15X eyepiece and a 40X objective are used together?
Ans:Microscope lenses are eyepiece (situated near eye) and objective lens(situated near the sample).Magnification is calculated by multiples of power of eyepiece and power of objective lens.Magnification of 15X and 40X is 600X.
2. What would happen if direct sun rays are focused by the mirror into the body tube?
Ans:When sun rays are focused by the mirror into the body tube, magnified images of the specimen can be seen.But sunlight is harmful to human eyes.
3. What is the difference between a dissecting and a compound microscope?
Ans:Dissecting microscope has magnification upto 70X and compound microscope has magnification from 400X to 1000X.
4. To which part of a microscope are the objective lenses fitted?
Ans:Objective lenses are located to the rotating nose piece.They are used to magnify the image of specimens.
Viva Questions
1. What are the different types of microscopes known?
Ans: Simple microscope,compound microscope,electron microscope,
Stereo microscopes are different types of microscopes.
2. Which lens is used in the compound microscope?
Ans: Compound microscope uses two convex lenses. One is the eyepiece or ocular lens and the other is an objective lens.
3. What magnification does the microscope need to see bacteria?
Ans: Bacteria are microorganisms (small organisms).1000X magnification can view the bacteria .
4. What type of microscope is most used in science classes?
Ans: Stereomicroscope, compound microscope is most used microscopes in science classes.
5. Why do we need to start with the lowest magnification setting when using a microscope?
Ans: When we use a compound microscope we start with lower magnification as it allows us to focus our specimen and the cells.
6. What is the use of a compound microscope?
Ans: Compound microscope has high magnification.Study of bacteria made easy through compound microscope.
7. What is base in a compound microscope?
Ans: Bottom of the microscope that supports the microscope.Illuminator is located at the base of the microscope.
8. Who invented the compound microscope?
Ans: Hans and Zacharis Janssen invented compound microscopes in the late sixteenth century.
9. Who is the father of the microscope?
Ans: Antonie van leeuwenhoek is the father of microscope.He observed bacteria, vacuole of the cell.
10. What are the parts of a compound microscope?
Ans: There are three parts of a compound microscope. They are the head, base, and arm(connects the base and head of the microscope).
Practical-Based Questions
The magnifying power of the compound microscope is the product of the magnification of the objective lens and _____.
Eyepiece
Arm
Reflector
Body tube
Answer: A. Eyepiece
The use of a single convex lens or groups of lenses is found in _____.
Telescopes
Fluorescent lamps
Magnifying glass
Option A and C.
Answer: D. Option A and C.
_____ is the metallic platform that is fitted to the lower part of the arm with a hole in the centre.
Base
Drawer tube
Stage
Automatic Stop
Answer: C. Stage
The stereo microscope provides
Single-dimensional picture
Image in two dimensions
Image in three dimensions
None of the options
Answer: C. Image in three dimensions
The ____ can be changed to focus the light.
Condenser
Base
Stage
Automatic Stop
Answer: A. Condenser
How much magnification does the eye's lens offer?
2x
3x
15x
50x
Answer: C. 15x.
The _______focuses the image under low power.
Revolving nosepiece
Fine adjustment knob
Coarse adjustment knob
Arm/neck
Answer: C. Coarse adjustment knob
The__________ sharpens the image under high magnification.
The diaphragm
Fine adjustment knob
Coarse adjustment knob
The ocular
Answer: B. Fine adjustment knob
A light microscope that has more than one lens, the ocular and objective lens, is called a _______________.
Compound microscope
Microscope
Electrical microscope
Telescope
Answer: A. Compound microscope
The higher the magnification, the ________ you see of the specimen.
More
Less
Higher
Lower
Answer: B. Less
Conclusion
One of the common microscopes that are widely used for the observation of specimens is the compound microscope. It has a combination of lenses. The compound microscope is mostly used to examine the structural specifics of individual cells, tissues, or organ parts. Compound microscope components can be divided into two categories:
Mechanical and optical parts. The mechanical parts include a base, pillar, arm, stage, inclination joint, clips, diaphragm, nose piece, body tube, fine adjustment knob and a coarse adjustment knob. The optical part includes an eyepiece lens, mirrors and objective lenses. This topic has provided all the information regarding parts of a compound microscope in detail.
FAQs on Class 11 Biology Parts Of The Compound Microscope Experiment
1. Which parts of a compound microscope are most important to label in a diagram for the CBSE Class 11 practical exam?
For a high-scoring diagram in the Class 11 Biology practical exam, you must accurately draw and label the following essential parts: Eyepiece (Ocular Lens), Body Tube, Revolving Nosepiece, Objective Lenses (mentioning different magnifications like 10x, 45x), Stage with clips, Diaphragm, Condenser, Mirror (plane and concave), Arm, Base, Coarse Adjustment Knob, and Fine Adjustment Knob. Ensuring clean lines and correct placement is crucial for full marks.
2. What are the functions of the two primary lens systems in a compound microscope?
A compound microscope uses two main lens systems to achieve high magnification, which is a key question for exams. Their functions are:
- The Eyepiece (Ocular Lens): This is the lens you look through. It typically has a magnification of 10x or 15x and magnifies the intermediate image formed by the objective lens to produce the final virtual image.
- The Objective Lenses: These are the lenses closest to the specimen. Mounted on a revolving nosepiece, they provide the initial magnification (e.g., 10x, 40x, 100x). They form a real, inverted, and magnified intermediate image inside the body tube.
3. How is a compound microscope fundamentally different from a simple microscope?
The fundamental difference, often asked in vivas, lies in the number of lenses and magnification power. A simple microscope uses a single convex lens to produce a magnified image and offers low magnification. In contrast, a compound microscope uses a combination of at least two lens systems—the eyepiece and the objective lens—to achieve a much higher level of magnification. This two-stage magnification allows it to resolve and view microscopic objects like cells, which are invisible to a simple microscope.
4. Explain the working principle behind a compound microscope's magnification.
The working principle of a compound microscope is based on two-stage magnification. First, the objective lens, positioned near the specimen, forms a real, inverted, and magnified image. This image acts as the object for the second lens, the eyepiece (or ocular). The eyepiece then functions like a simple magnifier, creating a final virtual, highly enlarged, and inverted image that the observer sees. The total magnification is the product of the magnification power of the objective lens and the eyepiece lens.
5. Why is it critical to use the coarse and fine adjustment knobs correctly?
Using the adjustment knobs correctly is a crucial practical skill. The Coarse Adjustment Knob is used for rapid, large-scale focusing, but only with the low-power (10x) objective lens to initially locate the specimen. Using it with high-power lenses can crash the lens into the slide, causing damage. The Fine Adjustment Knob is used for sharp, precise focusing after the initial focus is achieved, especially with high-power (40x and above) objectives. Using the fine knob prevents damage and allows for clear observation of minute details.
6. What is the role of the diaphragm and mirror in observing a specimen, and how do they affect image quality?
The diaphragm and mirror form the illumination system, which is vital for image clarity. The mirror (with a plane and a concave side) reflects external light up through the specimen. The diaphragm, located below the stage, is an adjustable aperture that controls the amount of light reaching the specimen. Properly adjusting the diaphragm is essential; too much light can wash out details, while too little can make the image dim. This control over light intensity and contrast is a key step in getting a high-quality image.
7. For the CBSE 2025-26 syllabus, what common errors should a Class 11 student avoid while using a compound microscope to earn full marks in the practicals?
To score well in practicals, students must avoid these common mistakes:
- Focusing with High Power First: Always start focusing with the low-power objective and the coarse adjustment knob.
- Incorrect Illumination: Forgetting to adjust the mirror and diaphragm for optimal, even lighting.
- Air Bubbles in the Mount: Preparing a slide with air bubbles that obstruct the view of the specimen.
- Vibrations: Placing the microscope on an unstable surface or handling it roughly during observation.
- Dirty Lenses: Not cleaning the eyepiece and objective lenses with appropriate lens paper, leading to a blurry or unclear image.
8. Why is the 'resolving power' of a microscope often considered more important than its 'magnifying power'?
This is a higher-order thinking question. While magnifying power simply makes an object appear larger, resolving power is the ability of the microscope to distinguish between two closely spaced points as separate entities. Without sufficient resolving power, increasing magnification would only result in a larger, blurry image. For observing fine cellular details like organelles, high resolving power is more critical than high magnification alone, as it provides clarity and detail, not just size.