


Quick Guide: How Each Microscope Part Works and Why It Matters
A microscope is an instrument that is used to examine objects which are too tiny. There are different types of microscopes used for different purposes. It is mainly used by forensic scientists, jewellers, technicians, investigators, biological scientists, etc.
The parts of the microscope and their uses are divided into two categories: structural parts and optical parts. You may have seen a microscope before but to remember the names of all its parts and their functions, let’s dig deeper into this article.
Microscope
Parts of the Microscope
A microscope is usually made up of two main parts, a part that holds and supports the microscope and its components, and the optical part that is used to examine or observe the images of a specimen/object. So let’s study more about these parts of the microscope and their uses.
Structural Parts: Head, Arm, Base
Optical Parts: Eyepiece, Eyepiece tube, Nosepiece, Objective lenses, Adjustment knob, Stage, Stage clips, Aperture, Microscopic illuminator, Condenser, and Diaphragm

Parts of a Microscope
Structural Parts of a Microscope
As the name suggests, the structural part of a microscope gives the support and handles all the components of a microscope. As we already know the names of these parts, let’s read more about them in detail.
Head
The head is the uppermost part of the microscope and this head portion is also known as the body tube. It connects the eyepiece and objective lenses.
Arm
The arm is the structural part that connects the head part of the microscope to the base. It is also used for carrying the microscope.
Base
The base is the bottom of the microscope on which it stands. It provides overall support.
Optical Parts of a Microscope
The optical parts are the main parts of the microscope as these are used to observe or examine the specimen. So let’s read about each microscope's parts and functions thoroughly.
Eyepiece
The eyepiece is seen at the top of the microscope and it consists of two lenses: the ocular and the eyepiece. The power of an ocular lens usually varies from 5x to 30x.
The use of an eyepiece in the microscope is to see the specimen and identify the image of the specimen. It also helps to correct the defects that are present in the specimen.
Eyepiece Tube
It is located above the head portion of a microscope and it is used to connect the ocular lens and eyepiece to the objective lenses.
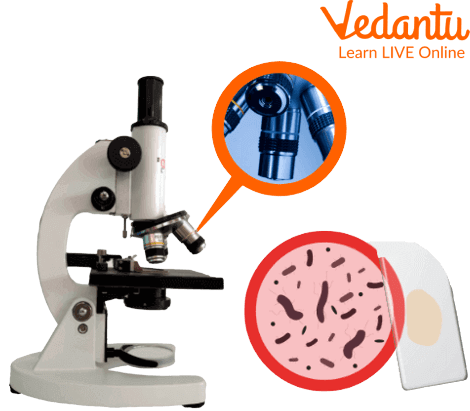
Nosepiece
Just below the eyepiece tube, the nosepiece is located. It is used to hold the objective lenses. The nosepiece is also known as a revolving turret. It is also used to change the magnification power by simply rotating it.
Objective Lenses
These are located just below the nosepiece. There are usually 3 to 4 objective lenses in a microscope with different magnification powers. Also, 4x (scanning objective), 10x (low power), 40x (high power), and 100x (oil immersion) are the most common kinds of objective lenses.
These lenses are used to increase the magnification levels, and to bring together the light rays coming from all the points of the specimen/object.
The Adjustment Knob
These are located over the objective lenses and these two adjustable knobs are commonly known as the Fine Adjustment Knob and the Coarse Focus Knob. The first dial that is used to bring the object/specimen in focus is the Coarse Focus Knob and the second dial that is used to bring the specimen in focus is the Fine Focus Knob.
Stage
It is a flat platform found just below the objective lenses and there is a test specimen/sample that is placed over it for simple viewing. Also, most microscopes consist of a mechanical stage that has a knob to control the slide.
Stage Clips
Every microscope has two stage clips and it is located just over the stage. The function of stage clips in the microscope is to hold the object/specimen slides in place.
Aperture
The aperture is the hole in the stage that is located just below the objective lenses. It helps in transmitting the base lightly to the stage.
Microscopic Illuminator
The optical microscope contains an internal source of light known as an illuminator. It is located at the base of the microscope. These work as a built-in light source of a microscope, and even catch the light from other external sources.
Rack Stop
It regulates the distance of the stages. Moreover, it also prevents the objective lens from being too close to the specimen slide. It is found over the stage.
Condenser
A condenser lens is used to illuminate the light that shines through the slides and helps attain the sharp images of the object to be studied or observed on the microscope stage. They have a very high magnification of 400X. These condensers that have high magnification powers usually produce a high-quality image.
Diaphragm
It is also known as iris, it helps change the intensity and the size of the cone of light that is illuminated upwards in the slide. Also, it is located just above the condenser.
Summary
The microscope is made up of various parts categorised as structural and optical parts. And each part of the microscope has different functions and importance. The microscope sits on a base and its arm connects the base to its head. The adjustment knobs can be found below the arm, and the stage is where the aperture, specimen and diaphragm are located. The eyepiece and objective lenses are located just at the top of the arm. Also, the arm acts as a handle for a microscope. In this article, we learnt about microscope parts and functions. We also looked at the different types of microscopes.
FAQs on All Important Microscope Parts and Their Functions
1. What are the main parts of a compound microscope and their primary functions?
A compound microscope has several key parts that work together to magnify an object. The main components and their functions are:
- Eyepiece (Ocular Lens): The lens you look through, which typically magnifies the image by 10x.
- Objective Lenses: A set of lenses on a revolving nosepiece with varying magnifications (e.g., 4x, 10x, 40x) that provide the initial magnification of the specimen.
- Stage: The flat platform where the slide with the specimen is placed.
- Illuminator (Light Source): Provides light to pass through the specimen, making it visible.
- Diaphragm: Controls the amount of light reaching the specimen, which helps adjust the image contrast.
- Adjustment Knobs: The coarse and fine knobs are used to move the stage to focus the image.
- Arm and Base: These form the structural frame of the microscope, used for support and handling.
2. What is the difference between a simple microscope and a compound microscope?
The primary difference lies in the number of lenses used. A simple microscope uses a single convex lens to magnify an object, much like a standard magnifying glass. A compound microscope uses two sets of lenses—the eyepiece lens and an objective lens—to achieve much higher levels of magnification and resolution, allowing for the detailed observation of microscopic specimens like cells.
3. What are some important real-world uses and applications of a microscope?
Microscopes are essential tools in many fields. Key applications include:
- Medical Diagnosis: Pathologists use microscopes to examine blood, tissues, and other biological samples to diagnose diseases.
- Forensic Science: They are used to analyse evidence from crime scenes, such as hair, fibres, and gunshot residue.
- Biological Research: Scientists study the structure of cells, bacteria, and other microorganisms to understand life processes.
- Material Science: Engineers use them to inspect the microstructure of metals and other materials for defects.
4. How do you calculate the total magnification of a microscope?
To find the total magnification, you multiply the magnification power of the eyepiece lens by the magnification power of the objective lens currently in use. For example, if the eyepiece is 10x and you are using the 40x objective lens, the total magnification would be 10 × 40 = 400x.
5. What is the specific function of the diaphragm on a microscope?
The diaphragm, located under the stage, is used to control the intensity and size of the cone of light that projects onto the specimen. By adjusting the diaphragm, you can regulate the contrast and brightness of the image. Reducing the light can often make transparent specimens appear more detailed.
6. Why is it a standard practice to start viewing a slide with the lowest power objective lens first?
Starting with the lowest power objective is crucial for two main reasons. First, it provides the widest field of view, which makes it much easier to scan the slide and locate the desired part of the specimen. Second, it provides more clearance between the lens and the slide, preventing you from accidentally crashing the lens into the slide while using the coarse adjustment knob for initial focusing.
7. What is the difference in function between the coarse adjustment knob and the fine adjustment knob?
The coarse adjustment knob is used for making large, rapid adjustments to the focus, moving the stage up or down significantly. It should only be used with the lowest power objective lens. The fine adjustment knob is used for making very small, precise adjustments to bring the image into sharp focus. It is the only focusing knob that should be used with high-power objective lenses.
8. How does an electron microscope's capability differ from a standard light microscope?
A light microscope uses beams of light to create a magnified image and is used to see whole cells, bacteria, and tissue samples. Its magnification is limited by the wavelength of light. An electron microscope uses beams of electrons instead of light, which have a much shorter wavelength. This allows it to achieve far greater magnification and resolution, making it possible to see extremely small objects like viruses and even individual molecules within a cell.
9. Why is an illuminator or mirror a critical component for viewing most biological specimens?
Most biological specimens, such as onion peels or cheek cells, are translucent, meaning light can pass through them. The illuminator (or mirror) provides the light that shines through the specimen on the slide. This transmitted light carries the image of the specimen's structure up through the lenses to your eye. Without this source of illumination, the specimen would remain dark and completely invisible.